3.07.2010

DIY Hardwood Floor Refinishing

101_8273
Last fall, we refinished our hardwood floors. The whole process took a good long weekend. Many wonder if it is even worth the energy to do-it-yourself. It is definitely a back-breaking job and it makes your house a crazy mess with sawdust EVERYWHERE! But the results are worth it.


Here is a break-down for those who are considering refinishing their own hardwood floors.


Supply List and Cost (for ~600 sq. ft.)


Large floor drum sander
Orbital edger sander
Sandpaper for each sander (60 grit & 100 grit)
(1 day rental)
$95.00
Funnel $4.00
Watering can (like for plants) $10.00
Pole sander sandpaper (120 grit) $6.00
7 gallons Water-Based Semi-Gloss Polyurethane ($44.00/gallon can) $308.00
2 quarts wood conditioner $24.00
Lambskin floor applicator $8.00
Shoe covers $3.00
Paint/Stain Brush
$10.00
Dust masks
$5.00
Eye goggles, ear plugs
$6.00
Total
$479.00

Process
I’m just going to give a quick run down on the overall process. You’ll find your own rhythm once you get going.


1. Drum sander – 60 grit sandpaper – start at one edge of room and pull sander to the center of the room. Do same on other side of room. Meet in the middle. Make sure sanding start and finish marks blend well in the center of the room.


(I know this seems like a no-brainer, but I just have to say: go with the grain of the wood. Our floors had all sorts of deep marks going against the grain – not good. Also, if your floors are in horrible condition, start with a lower grit sandpaper and work your way up.)


2. Orbital edge sander – 60 grit – go in circular motions around edge of room getting as close as you can to the wall. (Warning: You will become a hunchback at this job!)


3. Repeat steps 1 & 2 again for another pass.


4. Now do 2 more passes with both sanders - this time using 100 grit sandpaper.


5. Vacuum and clean floors with a very damp rag.


6. Apply wood conditioner.


7. Sand with pole sander – 120 grit sandpaper.


8. Repeat step 5 again.


9. Ready for polyurethane application #1. Use watering can to make small puddle along a wall. Drag puddle using the lambskin applicator. Keep a wet edge – just like with watercolor painting. Add more polyurethane as needed, but not so much that you have a huge puddle at the very end. Kinda messy to clean up. If you do have extra at the end, soak it up in the lambskin and squeeze into bucket until excess is gone. Will make lots of bubbles in the bucket which isn’t ideal if you are going to use it. (Also, make sure you can end at a doorway or exit or else you’ll be trapped!)


10. Let dry for at least 2 hours.


11. Do coat #2 (just like the first coat). Let dry at least 2 more hours.


12. Sand with pole sander – 120 grit sandpaper.


13. Repeat step 5 yet again. (You’ll be sick of cleaning your floors by now!)


14. Apply coat #3. This should be the last coat if all went well. Wait about 72 hours before you put furniture down.


All done! Yes!


Here are some pics:


Before: (Notice the staining near the center of the picture and near the entryway.)
101_8087


 After:
101_8278 101_8274
101_8277
101_8280


In this last photo, it is interesting to see how paint color and lighting can change how the floor appears.
Good luck with your floor refinishing!

3.06.2010

Things in a Row

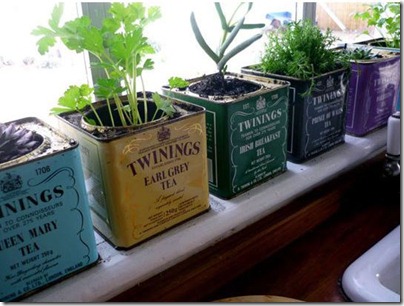
1.Apple Row2.Tea Tin Garden

3.

Light Bulbs

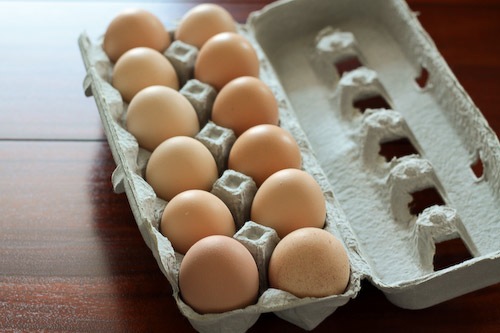
4. Fresh eggs

[image sources]

1. Apples apples in a row. Crisp goodness. apples

2. Garden on the mind. Why not bring it inside? Fun use for extra tea tins. tea tin garden

3. Light bulb simplicity. bare bulbs

4. Back on the farm. Scrambled sounds nice. fresh eggs

***Peddlers Station

Peddlers Station, 645 Custer Ave., Billings, MT 59102

By the way – last Saturday we rode our bikes down to a local antique shop called Peddlers Station (6th & Custer). We had never been there before, but when we walked in they mistook us for a couple that came in a year ago on their bikes and bought a chalkboard. Hmm…who could that have been, our good friends S & L perhaps? Hilarious!

IMG_0060

Here is a picture I bought for $5 – and they even delivered it to our house! Awesome little store – must ride your bike there to visit.

Have a wonderful Saturday! Great day for a bike ride!

IMG_9595

3.02.2010

The Bench

It has been beautiful here lately! Sunshine, squishy mud, crisp air. Love it. It makes me really excited to plant a garden soon. So excited that I bought a shovel the other day just to dig some holes. Yup. That is right. I’m a dork.
Whelp. Lets see here. I have been working/playing a lot in the basement “studio”. A couple weeks ago I refinished this little stool. It is a friend to a sewing table and just needed a new hairdo.
Here is a peek at the torture it went through:
::Before

::In progress


I disassembled the bench and used 220 grit sandpaper to remove all the old varnish. With sanding, I developed more of an appreciation for straight simple designs in furniture. Curvy details are definitely a bugger to sand.


Linseed oil brings life to wood. I applied 2 coats of linseed oil and then 2 coats of wax.  A nice natural finish. Beautiful rich walnut with warm red tones. It is amazing what sometimes lies beneath a stain or varnish.


I find it very interesting how traditional upholstery used animal hair (such as horse hair) for the guts of furniture. Here, it was intact and in good condition, so I kept it as the guts of the seat cushion. Then, I topped it off with synthetic foam for extra cushion and height.


::After
     IMG_9415 
I love how the curves reflect light. It gives dimension and class to this good little bench.
I know the fabric isn’t the most trendy – the local fabric options are a bit lacking here for decor weight. But it was cheap. I’m a fan of the frugal factor.
__________________________________________________________
On the fabric note, there are quite a few places online to find killer deals on designer fabric. One great site is www.fabric.com. There, I found fabric for my next project: The Grandma Chair. Here is a sneak peek at the fabric I’ll be using:
P Kaufmann Indoor/Outdoor Soho Sorbet
P. Kaufmann Indoor/Outdoor Soho Sorbet
Geometric. Fresh. Simple. Makes me thirsty for orange juice…

2.09.2010

Tucked Away

Imagine climbing the hill and standing at the top of the cliff. Or sledding down it in the winter. Or fishing off the edge. Wow! I am in awe of God’s beautiful creation and landscapes! What a neat little home nesting place. Can I go visit?

Iceland house

::via pixdaus

2.05.2010

Spices and Felt

Found some other unique ideas for organizing spices:

Test Tube Spices

Test Tube Spices 3

::via www.apartmenttherapy.com

And felting:

Felt Cushions

::via www.designspongeonline.com

Custom Graphics Land

I have the coolest sister ever. She just surprised me with a new header for my blog! I love it! I’ve now just graduated from “default pre-made header land” to “custom graphics land”.

Hannamades

 This next image is pretty special too. It was an exercise for one of her graphic design classes focusing on a family member. Focus: hand drawn, up/down and side/side strokes, serif font, decorative title font capturing character of person, etc.

Grandpa Al. I love how it captures his character and personality with the simple descriptors and fun art style. Love it!

Mary, thanks for sharing! Keep up the good work!

January_11

::DOA – Descendant of Al

2.02.2010

Felt Furniture

Really? I never thought one might use wool felt in home decor and furnishings. Interesting…

Felt Furniture ::via www.keeseh.com

By the way – this is a cool place that does all sorts of experiments with materials. I like.

And here highlights a supplier of the thickest felt you can imagine.